
I have always had a soft spot for the artistry of stop-motion videography. From my earliest exposure with the kid’s show Chapi Chapo to the beautiful closing sequence of the film Lemony Snickets, stop motion has always mesmerized me. There is something magical in animating inanimate objects and molding and moving them to create motion and tell stories. Using stop motion animation to create the Reid Middleton e-card was an exciting, energizing, and, at times, painful process!
Stop motion is like video in that a sequence of images is displayed one after another to create the illusion of motion. The difference is that in stop motion, you take a picture for every frame of video you want to show. Normal video is shot at 30 frames or pictures per second of footage, so with the Reid Middleton video being 84 seconds long, we ended up taking well over 2,500 pictures to create the e-card!
Watch Reid Middleton’s 2011 Holiday E-card
This is how we did it.
Step 1: Concept
Show how one of our favorite shapes, the circle, can represent many aspects of the holidays by creating three distinct holiday scenes with the circle as the focal point. Moving into production, I enlisted the help of Ben Llanes, marketing coordinator, as assistant director.
Step 2: Storyboard
Take the concept and detail how the story is going to progress through the scene. For example, when does the cookie get eaten or when does the snowman’s hat fly away? Next we developed scene transitions, i.e., how do you get from a full plate of cookies back to the blank circle? Ben and I worked through some options and came up with the idea to use a Lazy Susan to create a smooth transition from finished scene to blank canvas.
Step 3: Build, draw, paint
Study the storyboard and list every piece in each scene needed to tell the story, then create them. For example, in the snowman scene, I needed three different midsections: a blank one, one with arms out, and one with arms up to the face for the surprised look. I got out my watercolors, woke my dormant fine art skills, and set about painting. Then I cut the individual pieces out of extra thick watercolor paper.
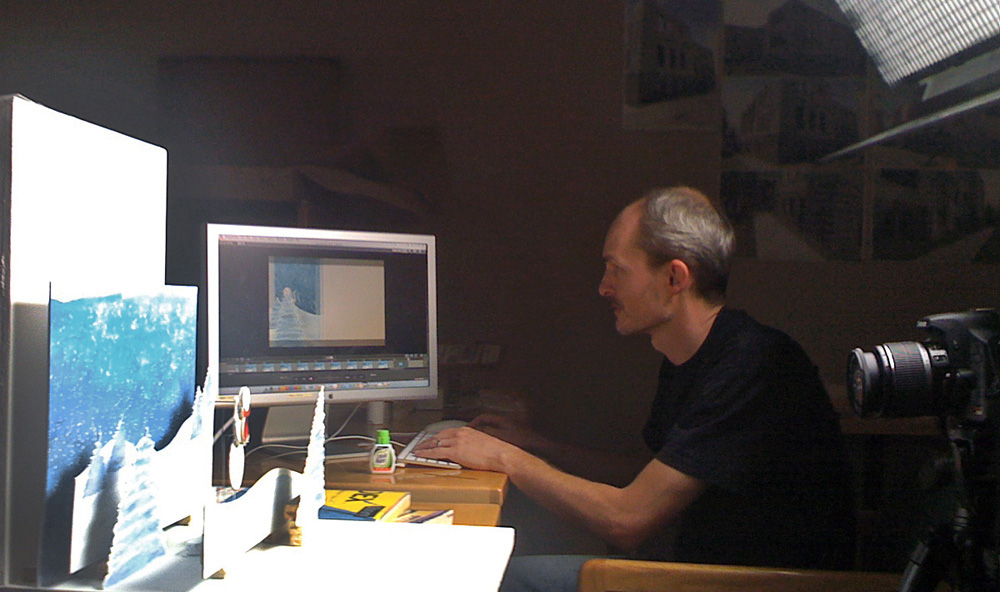
Next, I calculated the size of stage we needed to get all the different elements on screen, got some plywood, the Lazy Susan mechanism, some power tools, paint and screws, and built a small film stage. To get the artwork to stand up as they were moved, we used hot glue to affix thin metal rods to the cutouts, inserted the rods into lead fish weights for bases, and painted the rods white to minimize their appearance.
Step 4: Filming
There are three key elements to this step.
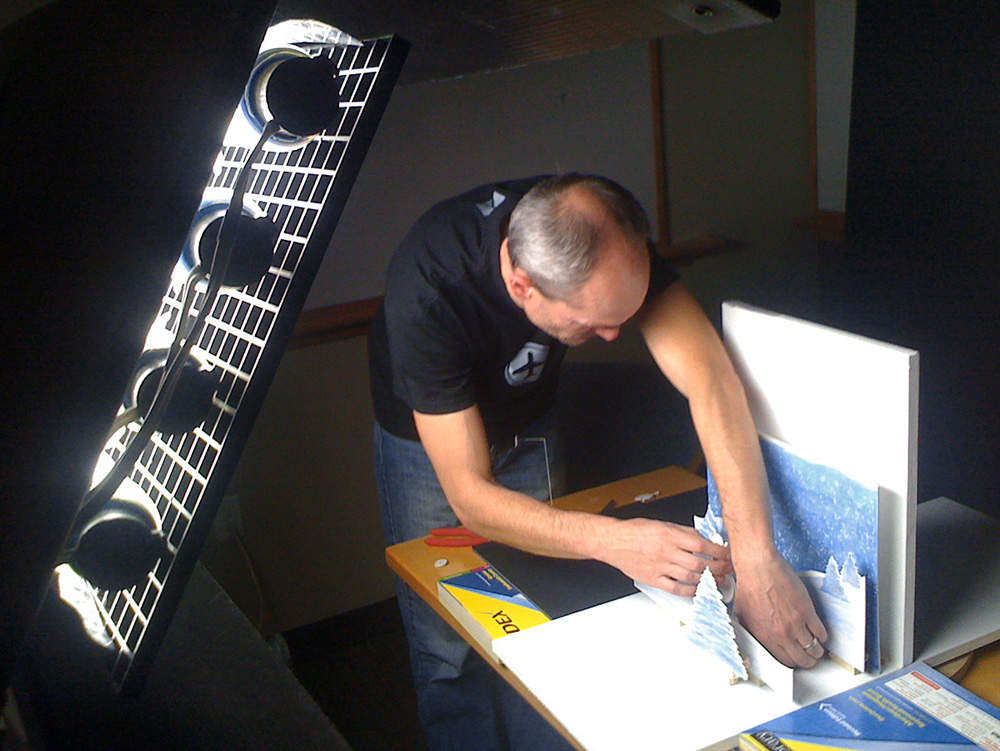 Lighting. Being able to clearly light your subject and using that light to highlight and downplay certain aspects of each scene is critical. I didn’t have much experience in this area, and I felt like the stage could have been better lit.
Patience. It was an excruciatingly slow process moving each element a fraction of an inch for each shot. To know what fraction each element had to move, we first needed to know the distance it had to travel and the amount of time it should take to get to its stopping point. Then we needed to figure out the distance it would have to travel in each frame. For example, one of the trees needed to travel four inches in four seconds. In four seconds, there are 120 frames, so we ended up with having to move the tree 1/30th of an inch every time we took a picture. That’s a lot of figuring and patience – especially when you slightly bump another element and have to adjust it so it doesn’t look out of place in the next shot. This is where the third element helped tremendously.
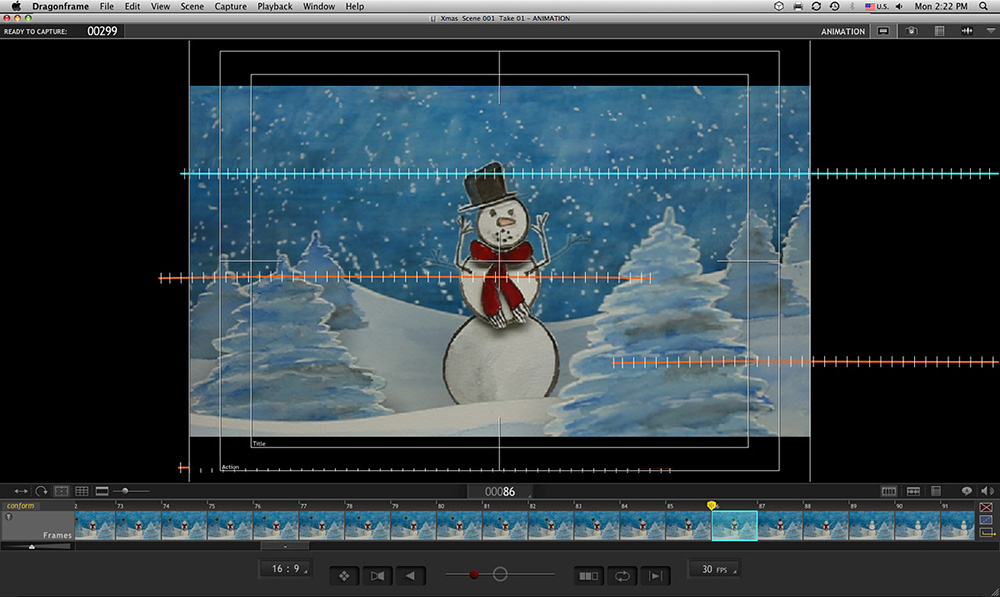
Software. We used Dragonframe. This software was a great help in keeping our scenes organized and moving forward. We were able to see on our monitor a live view of what our DSLR camera saw and, more importantly, it allowed us to project translucent images of progressive frames on top of each other (a process called onion skinning). This let us see clearly how far we had moved an element and if we had knocked anything out of place.
Step 5: Post-production
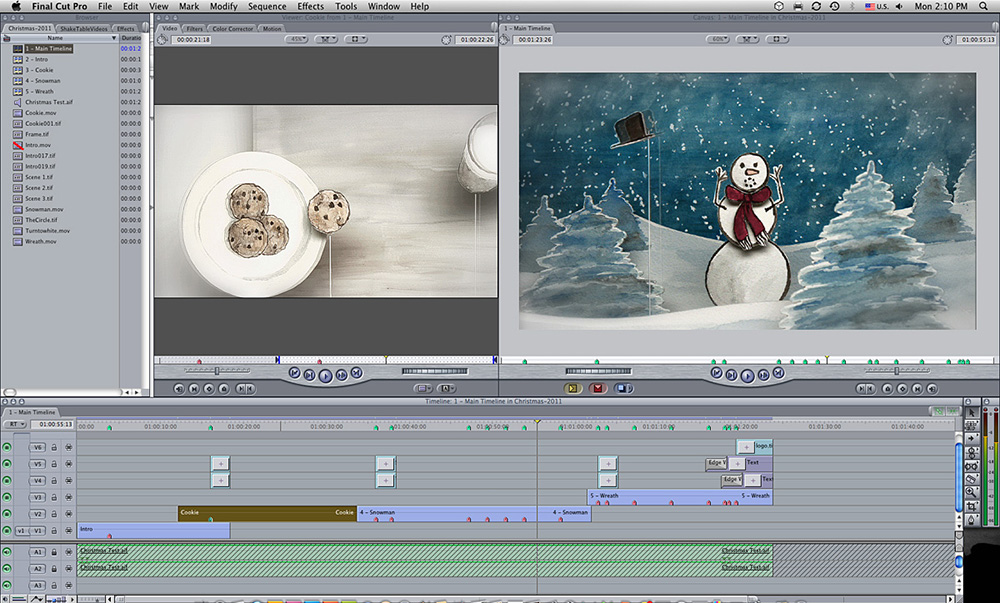
Where the magic happens: taking the raw material and forming it into a final product! I took the different shoots, music, and digital titling and melded them together in Final Cut Pro editing software. It is in post production where you can make slight adjustments to pacing to match key moments in your music or where you cut down pieces that are too long. This is also when you do your best to fix your raw footage’s lighting and color issues with filters, adjustments, and other effects. It is also from Final Cut Pro that I exported the final product ready for posting on YouTube.
I know I didn’t hit on everything, but if you have any questions, I will do my best to answer them.
Here are some additional cool stop motion links (watch with sound if possible). Enjoy.
https://www.dragonframe.com/blog/raf-wathion-and-300000-candles/
https://www.dragonframe.com/blog/acura-wall-art-shot-with-dragon/
http://www.youtube.com/watch?v=qIZ2lua9aQA
Disclaimer: Reid Middleton is not responsible for the content of external links or any associated content on those pages.
Staff pictures with our Santa in Residence, Allan Morgan, brought in $625 in donations for the American Cancer Society! Thanks for your time Santa, photographer Ben Llanes, and coordinator/media Vicky Fleer.