

Definition: The word, “photography” is from the Greek words ‘photos’ (light) and ‘graphein’ (to draw); in other words, drawing with light.
 Photography is capturing the action of light upon a particular scene. Humans are highly visual creatures who assign importance and meaning to things based on the visual cues we receive from our eyes. Because of our visual nature, photographs are important to human communication.
In this business of architectural and engineering design, communicating professional architectural/engineering services visually can be challenging. It certainly is compared to tangible products like ice cream, sports cars, or smart phones. To effectively market the capabilities and experience of a professional design firm, project photography often takes center stage.
What makes for good project photography? While there are a wide range of possibilities, the following are some important considerations:

- Decent exposure. The presence of too many shadows or highlights leads to missing information, which is essential to having a photograph represent reality. Avoid taking photographs in harsh or direct sunlight. Instead, take photos in early morning light or late afternoon light when the sun is at a much lower angle in the horizon, causing light particle diffusion in our atmosphere leading to softer, more even lighting across your subject. Sunny, clear days can be your worst enemy. If you’re photographing details or project areas that don’t show much sky, an overcast day could be better because it provides even lighting to help bring out the details that might otherwise be washed or burned out from over or under-exposure.
- Clearly identify the subject. Besides ensuring your subject is correctly focused, ask yourself what you want to communicate about a particular scene; is it the intricate façade of a building or the whole building itself? Perhaps both. So, zoom in on details, as well as the overall building; do whatever you think best communicates what you want to express. This is where the concept of depth of field is useful. For example, when you want to isolate a subject, then a shallow depth of field would be used; the foreground and background are out of focus, and your subject is clear. If you want to show more detail, then a large depth of field, where all aspects (foreground, background, and subject) are in focus and crisp would be used. You can also use a slow shutter speed to emphasize movement. I imagine the designers of the first windmills sketched a kind of motion blur in their drawings to communicate this aspect of the design.
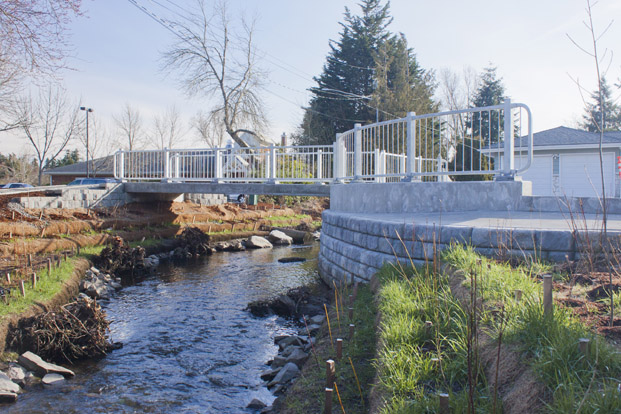
- Provide sense of setting. Show the surroundings of the project. Show nearby buildings, watersheds, sculptures, and artwork, etc., that help provide context clues to the viewer. Include the climate of the project. Is the project in the snowy arctic or a palm tree/desert climate?
- Shoot at different heights. When shooting a daycare facility, instead of taking photographs from adult eye level, get down low at a child’s eye level. In this way, you show a unique perspective, that of a toddler’s height, and get to see the facility through their eyes. By doing this, your photos will be more memorable. Also, try and shoot from sitting level rather than standing; this will help distinguish the foreground, mid-ground, and background.
- Become a student of your industry and study architectural and engineering photographs in magazines, newspapers, and online, making mental notes of what you like or dislike about each one. Then, go out and photograph, experiment, and keep incorporating in your photos the things you like about photos in published work. Have fun “drawing with light.”
- One last point. From a logistical standpoint, I’ve found that using checklists really helps you achieve successful photo shoots. Check out Esto Photographic’s checklist; it’s a great resource to use as a starting point.

Nice work Ben.
Bill